
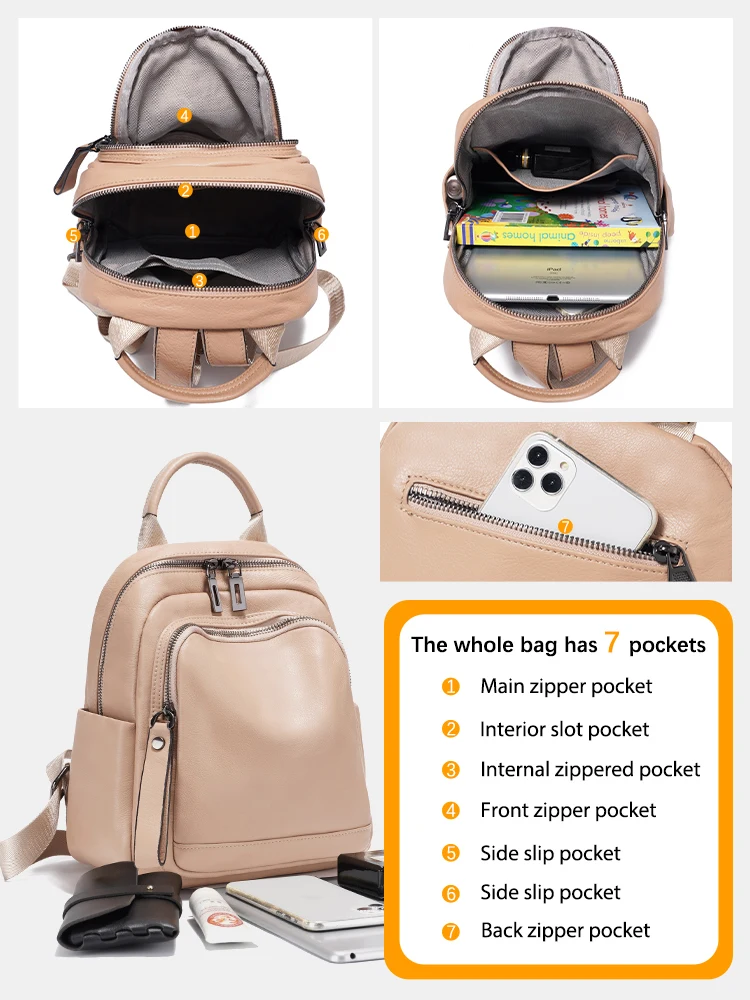
Understanding Your Leather Travel Backpack’s Needs
A quality leather travel backpack represents more than just a purchase—it’s an investment in your travel experience. With proper care, these premium companions can accompany you on adventures for years or even decades, developing character and charm along the way.
Taking care of your leather backpack isn’t just about maintaining its appearance; it’s about preserving functionality and extending its useful life. Studies have shown that properly maintained leather goods can last 3-5 times longer than those left without regular care. That means your $300 backpack could either last three years or fifteen years, depending solely on how you treat it.
Leather responds dynamically to travel conditions—from dry airplane cabins to humid tropical destinations. Without proper care, these environmental stresses can lead to premature aging, cracking, and deterioration. However, with simple DIY maintenance, you can not only prevent damage but also encourage the development of a beautiful natural patina—that coveted character that makes premium leather goods increasingly attractive over time.
Embracing leather conditioning and waterproofing doesn’t just save you money by avoiding costly replacements; it’s also an environmentally responsible choice. Quality leather products that last for years reduce waste and consumption, making your DIY leather care routine both economically and ecologically smart.
When browsing leather travel backpacks, understanding proper care techniques ensures you’ll enjoy your investment for years to come.
Identifying Your Backpack’s Leather Type
Before diving into care techniques, it’s crucial to identify what type of leather your backpack is made from. Different leather varieties require specific treatments, and using the wrong approach could damage your bag.
Common Leather Types in Travel Backpacks
| Leather Type | Characteristics | Durability Rating | Care Difficulty |
|---|---|---|---|
| Full-grain | Visible natural texture, develops rich patina | Excellent (8-10/10) | Moderate |
| Top-grain | Smoother surface, less visible natural marks | Very Good (7-8/10) | Easy to Moderate |
| Genuine leather | Often stiffer, more uniform appearance | Good (5-6/10) | Easy |
| Corrected-grain | Very uniform, may have embossed texture | Fair (4-5/10) | Easy |
| Suede/Nubuck | Soft, fuzzy surface with no shine | Fair to Good (4-7/10) | Difficult |
Full-grain leather backpacks represent the highest quality option, using the top layer of the hide with all natural grain patterns intact. This leather is incredibly durable but requires consistent care to maintain its qualities.
How to Identify Your Leather Type
Visual inspection: Full-grain leather shows natural variations, pores, and sometimes small scars or marks from the animal’s life. Top-grain appears more uniform but still has some natural character. Genuine and corrected-grain leathers look more uniform and perfect.
Touch test: Run your fingers across the surface. Full-grain feels natural with slight texture variations. Top-grain is smoother but still supple. Genuine and corrected-grain often feel stiffer and more plastic-like.
Flexibility test: Gently bend a small section. Quality full-grain and top-grain leather will feel supple and flexible, while lower-grade leathers may feel stiff or cardboard-like.
Edge examination: Look at cut edges of the leather. Higher quality leathers show fibrous structure throughout, while lower grades might have a layered appearance.
Understanding your backpack’s leather type forms the foundation for all the care techniques we’ll discuss. This knowledge ensures you’ll choose the right products and methods to preserve your backpack’s beauty and function for years to come.
Essential DIY Leather Care Kit: Tools & Ingredients
Creating your own leather care kit doesn’t require expensive specialty products. Most effective leather care ingredients are likely already in your kitchen or easily found at local stores. Here’s what you’ll need to assemble your DIY leather care arsenal:
Essential Tools
- Soft microfiber cloths – Lint-free options are best for applying products and buffing leather
- Clean sponges – For cleaning larger areas efficiently
- Soft-bristle brush – For removing dirt from crevices and textured surfaces
- Cotton swabs – Perfect for detailed cleaning around hardware and seams
- Small containers – For mixing and storing your DIY solutions
- Spray bottles – For applying certain cleaners evenly
Household Ingredients with Leather Care Properties
- White vinegar – Natural cleaner that helps remove salt stains and balance pH
- Olive oil – Provides mild conditioning properties (use sparingly)
- Mild pH-neutral soap – Gentle enough for leather cleaning (castile soap works well)
- Distilled water – Prevents mineral deposits that can damage leather
- Beeswax – Excellent natural waterproofing agent
- Coconut oil – Natural conditioner with mild antimicrobial properties
- Sweet almond oil – Lightweight conditioner that penetrates well
- Cornstarch/baking soda – Effective for absorbing oil and grease stains
- Essential oils (optional) – Cedar or sandalwood can add pleasant scent and mild preservative qualities
Storage Considerations
Store your DIY mixtures in cool, dark places to extend their shelf life. Label each container with contents and date mixed. For beeswax-based products, room temperature storage works best as extreme temperatures can affect consistency.
When selecting ingredients, focus on natural, chemical-free options. These are not only gentler on your leather but also better for your skin and the environment. The leather care products you create yourself often work as effectively as commercial alternatives at a fraction of the cost.
By having these basic tools and ingredients on hand, you’ll be prepared to handle nearly any leather care situation that arises with your travel backpack.
Pre-Cleaning Preparation: Setting Up for Success
Proper preparation before cleaning your leather backpack ensures the best results and prevents potential damage. Follow these steps to set yourself up for success:
Empty the backpack completely – Remove all items from every pocket and compartment. Turn small pockets inside out if possible to ensure no items remain that could be damaged by cleaning or create mysterious bumps under your cloth.
Remove surface debris – Use a soft brush to gently sweep away loose dirt, dust, and debris from all surfaces, paying special attention to seams, corners, and hardware attachments where particles tend to accumulate.
Perform initial inspection – Examine your backpack in good lighting to identify specific problem areas that might need special attention, like stains, scratches, or dry spots.
Prepare your work area – Choose a clean, well-lit workspace with a flat surface. Cover your work area with a clean towel to protect both the surface and your backpack.
Test in an inconspicuous spot – Before applying any cleaning solution to visible areas, test it on a small hidden section of your backpack (like the inside of a strap or bottom corner) to ensure it doesn’t cause discoloration or damage.
Gather all needed tools and solutions – Have all your cleaning tools and prepared solutions within easy reach before you begin the actual cleaning process.
This preparation stage might seem time-consuming, but it prevents common mistakes that can damage leather. By taking these few extra minutes to prepare properly, you’ll achieve better results and extend your backpack’s life significantly.
DIY Leather Cleaners: Recipes and Application
Now that you’re prepared, it’s time to clean your leather backpack using safe, effective DIY solutions. These recipes use simple ingredients but deliver professional-quality results when applied correctly.
Recipe 1: Basic Soap Solution
This gentle cleanser works well for regular maintenance cleaning and light soil.
Ingredients:
* 1 cup (240 ml) of distilled water
* 1-2 drops of mild castile soap
Application:
1. Mix ingredients thoroughly in a small bowl
2. Dampen (not soak) a clean cloth with the solution
3. Wipe leather using gentle circular motions
4. Follow with a clean, damp cloth to remove soap residue
5. Allow to air dry away from direct heat sources
Recipe 2: Vinegar & Olive Oil Cleaner
This solution cuts through more stubborn dirt while adding light conditioning.
Ingredients:
* 1 part white vinegar
* 2 parts olive oil
Application:
1. Mix in a small jar and shake thoroughly before each use
2. Apply a small amount to a soft cloth (never directly to leather)
3. Work in with circular motions, focusing on soiled areas
4. Buff with a clean, dry cloth
5. This solution requires no rinsing but may need 24 hours to fully absorb
Recipe 3: Cornstarch Paste (for grease stains)
Perfect for absorbing oil and grease spots from restaurant mishaps or accidental spills.
Ingredients:
* 2 tablespoons (30 g) cornstarch
* 1 tablespoon (15 ml) water
Application:
1. Mix into a thick paste
2. Apply directly to the stain, covering it completely
3. Allow to dry completely (4-24 hours)
4. Brush away dried powder with a soft brush
5. Repeat if necessary
Remember that less is more when cleaning leather. Excessive moisture is leather’s enemy, so use dampened rather than wet cloths, and allow adequate drying time between applications. Many leather care experts recommend thorough conditioning leather backpacks after cleaning to restore moisture balance.
Natural Conditioning: Nourishing Your Leather Backpack
After cleaning, conditioning is essential to keep leather supple, prevent cracking, and maintain its natural beauty. This step replaces natural oils that are lost through use and cleaning. Here are effective DIY conditioner recipes using natural ingredients:
Recipe 1: Beeswax Leather Conditioner
This rich conditioner provides both nourishment and some water resistance.
Ingredients:
* 1 part beeswax pellets (1 oz/28 g)
* 2 parts coconut oil (2 oz/56 g)
Preparation:
1. Create a double boiler by placing a heat-safe bowl over a pot of simmering water
2. Add ingredients to the bowl and stir gently until completely melted
3. Remove from heat and allow to cool slightly but remain liquid
4. Transfer to a container with lid for storage
Application:
1. Apply a thin layer with clean fingers or cloth using circular motions
2. Pay extra attention to areas that bend or flex frequently
3. Allow to absorb for 10-15 minutes
4. Buff away any excess with a clean cloth
5. Let cure for 12-24 hours before heavy use
Recipe 2: Simple Oil Conditioner
A lighter option that’s perfect for more frequent conditioning.
Ingredients:
* Choose one: coconut oil, olive oil, or sweet almond oil
Application:
1. Apply a tiny amount to a soft cloth (a little goes a very long way)
2. Work into leather using small circular buffing motions
3. Start with thin applications—you can always add more if needed
4. Focus extra attention on stress points and edges
5. Allow to absorb for 30 minutes
6. Buff thoroughly with a clean cloth to remove any excess oil
Conditioning Frequency Guidelines
| Usage Level | Climate | Recommended Frequency |
|---|---|---|
| Light use | Moderate climate | Every 3-6 months |
| Light use | Very dry climate | Every 2-3 months |
| Regular travel use | Moderate climate | Every 1-2 months |
| Regular travel use | Very dry climate | Monthly |
| Heavy use or extreme conditions | Any climate | After exposure or monthly |
Signs that your backpack needs conditioning include leather feeling dry or stiff to the touch, a dull appearance, or visible dryness at flex points. However, over-conditioning can make leather too soft or oily, so finding the right balance is important.
Many travelers wonder if oiling leather waterproofs it, and while oils do provide some temporary water resistance, they don’t create true waterproofing. For better protection, the beeswax recipe or a dedicated waterproofing treatment (covered in a later section) works better.
Tackling Common Travel Issues: Stains, Scratches & Water Damage
Travel inevitably exposes your backpack to challenging conditions. Here’s how to address the most common problems using simple DIY techniques:
Water Stains and Rain Spots
When caught in unexpected rain or spills, water stains can leave visible marks on leather. To fix:
- Even dampening method: Slightly dampen a clean cloth with distilled water
- Gently wipe the entire panel of leather (not just the stain) to create even dampness
- Allow to air dry naturally away from heat sources
- Apply conditioner once completely dry
Scratches and Scuffs
Minor scratches are part of leather’s journey, but you can minimize their appearance:
- Finger buffing technique: For light scratches, try buffing with your clean fingertip—natural oils can sometimes blend minor marks
- For deeper scratches, apply a tiny amount of coconut oil with your finger
- Gently work the oil into the scratch using circular motions
- Let sit for 10 minutes, then buff with a soft cloth
- Repeat if necessary, allowing time between applications
Grease and Oil Stains
Restaurants, airports, and vehicles all present opportunities for grease stains:
- Absorption method: Apply cornstarch or baking soda directly to fresh stains
- Allow powder to sit undisturbed for 12-24 hours to absorb oils
- Gently brush away powder with a soft brush
- If stain persists, repeat treatment
- Clean area with mild soap solution after stain is removed
- Condition leather after treatment
Mold and Mildew
Humid climates and storage conditions can lead to mold growth:
- Take backpack outdoors to prevent spore spread
- Mix equal parts white vinegar and distilled water
- Dampen (not soak) a cloth with the solution
- Gently wipe affected areas
- Allow to dry completely in sunlight if possible (but not prolonged direct sun)
- Apply a light conditioning treatment with antifungal properties (coconut oil works well)
For all these treatments, remember that patience is key. Multiple gentle treatments are always better than one aggressive one that might damage your leather. After addressing specific issues, always follow up with proper conditioning to restore leather’s moisture balance.

Protective Treatments: Waterproofing and Weatherizing
Protecting your leather backpack from the elements is crucial, especially when traveling through unpredictable weather conditions. Creating your own waterproofing treatment allows you to control exactly what goes onto your valuable leather.
DIY Beeswax Waterproofing
This natural formula creates an effective barrier against water without harmful chemicals.
Ingredients:
* 3 parts beeswax (3 oz/85 g)
* 1 part coconut oil (1 oz/28 g)
* Optional: 5-10 drops of cedar or sandalwood essential oil for scent and mild antimicrobial properties
Preparation:
1. Melt beeswax and coconut oil in a double boiler, stirring occasionally
2. Remove from heat once fully melted
3. Add essential oils if desired and stir to incorporate
4. Pour into a wide-mouth container and allow to cool
5. Store with lid in a cool place
Application:
1. Ensure leather is clean and dry before application
2. Using clean fingers or cloth, apply a very thin layer to leather surface
3. Pay special attention to seams and stress points
4. Use a hairdryer on low heat to warm the wax, helping it penetrate the leather
5. Buff away any excess with a clean cloth
6. Allow 24 hours to cure before exposure to water
This treatment typically lasts 1-2 months depending on usage and conditions. You’ll know it’s time to reapply when water no longer beads on the surface.
Natural Alternative Comparison
Different natural waterproofing options offer various benefits:
- Beeswax blends provide the best water resistance and longest protection
- Carnauba wax creates the hardest finish but can be more difficult to apply evenly
- Oil treatments (like mink oil or neatsfoot oil) offer the easiest application but shorter protection periods and may darken leather significantly
For those interested in a comprehensive approach, our complete guide to waterproofing leather bags provides even more detailed techniques.
Pre-Trip Protection Checklist
Before traveling, especially to wet or humid destinations:
* Apply protective treatment 48 hours before departure
* Test water resistance by sprinkling a few drops on surface (they should bead up)
* Pay extra attention to vulnerable areas like seams and closures
* Consider a second light application on high-stress areas
With proper waterproofing, your leather backpack can withstand light rain, accidental spills, and humid conditions without suffering damage that could shorten its lifespan.
On-the-Go Care: Emergency Field Maintenance
Travel inevitably brings unexpected situations that can put your leather backpack at risk. Being prepared with knowledge and a few key items can save your bag from permanent damage when you’re far from home.
Travel Leather Care Kit
Create a compact kit that fits easily in your luggage:
* Pre-moistened leather cleaning wipes (alcohol-free)
* Small tin of solid conditioner (beeswax blend works well)
* Stain removal wipes specifically for leather
* Microfiber cloth cut into smaller pieces
* Small spray bottle (under 3oz/100ml for carry-on compliance)
This mini kit allows you to address most situations without carrying your full leather care arsenal.
Hotel Room Solutions
When traveling with limited supplies, these common hotel items can help in emergencies:
* Bottled water instead of tap water (fewer minerals)
* Hand soap (only highly diluted, as a last resort)
* Unscented lotion in tiny amounts for emergency conditioning
* Shower steam to help remove wrinkles (hang backpack in bathroom during shower, keeping it away from direct water)
Timing Guidelines for Common Issues
Some problems require immediate attention, while others can wait:
Address immediately:
* Liquid spills (blot gently, don’t rub)
* Salt exposure (wipe with damp cloth)
* Bird droppings (highly acidic and damaging)
Can wait for proper treatment:
* Light dust and dirt
* Minor scuffs
* Dryness that’s not extreme
For travelers frequently on the move with their carry-on leather backpacks, developing these emergency care skills ensures your backpack remains in excellent condition throughout your journey.
Proper Storage: Protecting Your Investment Between Adventures
How you store your leather backpack between travels is just as important as how you care for it on the road. Proper storage prevents unnecessary damage and preserves your backpack’s shape and appearance.
Storage Preparation Checklist
Before storing your backpack for an extended period:
* Complete a thorough cleaning to remove all dirt and oils
* Apply a light conditioning treatment
* Empty all compartments and pockets completely
* Clean and polish hardware like zippers and buckles
* Leave zippers partially open to prevent stress on closures
Ideal Storage Conditions
Create the optimal environment for leather storage:
* Temperature: 60-75°F (15-24°C)
* Humidity: 40-60% (not too dry, not too humid)
* Good air circulation around the bag
* Protection from direct sunlight and artificial light
* Elevated off the ground, especially concrete floors
Maintaining Shape During Storage
Prevent unwanted creases and deformation:
* Stuff the backpack gently with acid-free tissue paper
* Avoid newspaper as the ink can transfer to leather
* Support straps in natural positions to prevent creasing
* Don’t hang by straps for long periods as this causes stretching
* Rotate position occasionally during very long storage
Storage Don’ts
Avoid these common storage mistakes:
* Plastic bags or containers (trap moisture and promote mildew)
* Direct sunlight (causes fading and drying)
* Attics or basements (temperature and humidity fluctuations)
* Proximity to heaters, radiators, or air conditioning vents
* Stacking heavy items on top of the backpack
Before placing your backpack in storage for an extended period, consider whether the leather should dry completely before conditioning if you’ve recently cleaned it. Proper drying prevents trapping moisture that could lead to mildew during storage.
DIY Leather Care Schedule: Creating a Maintenance Routine
Establishing a regular maintenance schedule for your leather backpack ensures it receives consistent care and prevents major issues. Here’s a framework to guide your leather care routine:
Maintenance Frequency Based on Use
| Usage Level | Cleaning | Conditioning | Waterproofing |
|---|---|---|---|
| Light use | Quarterly | Every 6 months | Annually |
| Moderate use | Monthly | Quarterly | Every 6 months |
| Heavy travel use | After each trip | Monthly | Every 2-3 months |
| Seasonal adjustments | Deep clean after summer | Extra conditioning before winter | Before rainy seasons |
Seasonal Care Considerations
Spring/Summer Care:
* Protect against increased UV exposure
* Watch for sweat and sunscreen transfer
* Clean more frequently due to dust and outdoor activities
Fall/Winter Care:
* Apply extra conditioning before cold weather sets in
* Protect against salt exposure in snowy areas
* Allow proper drying time after exposure to snow or rain
Pre and Post-Trip Care Routine
Before Travel:
* Clean thoroughly one week before departure
* Apply conditioning treatment 3-5 days before
* Add waterproofing protection 1-2 days before if needed
* Check and clean hardware functionality
After Travel:
* Assess for any immediate issues needing attention
* Remove surface dust and dirt
* Address any spots or stains
* Allow to rest 24 hours before detailed cleaning
* Complete full conditioning within a week of return
Signs That Indicate Need for Immediate Care
Don’t wait for your scheduled maintenance if you notice:
* Visible stains or discoloration
* Leather feeling dry or stiff to touch
* Unusual odors developing
* Water no longer beading on surface
* Visible cracking or excessive wrinkling at stress points

Carry On Leather Backpack, Roll Top Leather Backpack
Price range: $77.76 through $96.48 Select options This product has multiple variants. The options may be chosen on the product page
17 Inch Leather Laptop Backpack, Men's Leather Travel Backpack, Men's Leather Work Backpack
Price range: $106.28 through $143.88 Select options This product has multiple variants. The options may be chosen on the product page
Full Grain Leather Backpack, Men's Leather Laptop Backpack, Men's Leather Work Backpack
$353.46 Select options This product has multiple variants. The options may be chosen on the product page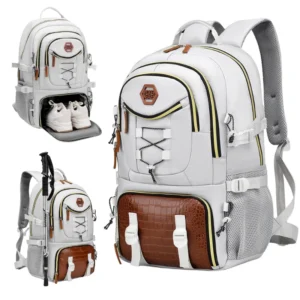
15 Inch Leather Laptop Backpack, Carry On Leather Backpack
Price range: $136.84 through $139.88 Select options This product has multiple variants. The options may be chosen on the product page $123.08 Select options This product has multiple variants. The options may be chosen on the product page
Women's Leather Backpack, Women's Leather Travel Backpack
$117.64 Select options This product has multiple variants. The options may be chosen on the product page
By incorporating leather care into your regular routine, it becomes a quick, simple process rather than an occasional major undertaking. This consistent attention is the key to maintaining your backpack’s appearance and extending its useful life by years.
When DIY Won’t Do: Recognizing Professional Care Needs
While DIY leather care can address most maintenance needs, certain situations call for professional intervention. Recognizing these scenarios can save your backpack from irreparable damage.
Signs Professional Help is Needed
Be alert to these indicators that your backpack requires expert attention:
* Deep structural damage to the leather
* Severe color loss or persistent staining
* Hardware issues affecting function that you can’t fix
* Stitching failures, especially along stress points or handles
* Mold that returns after multiple DIY treatments
* Strong, persistent odors that don’t respond to cleaning
* Severe water damage that has caused leather to warp or harden
Finding Quality Leather Care Specialists
When seeking professional help:
* Look for specialists with specific experience working with leather bags and backpacks
* Request examples of previous repair work on similar items
* Ensure they understand the specific type of leather your backpack features
* Ask for a clear explanation of their process and materials
* Get a detailed estimate and timeframe before proceeding
For owners of premium men’s leather travel backpacks, finding the right professional can make the difference between extending your backpack’s life by years or having to replace it prematurely.
Questions to Ask Before Selecting a Service
Before entrusting your backpack to a leather specialist:
* “What type of conditioning products do you use?” (Look for natural-based options)
* “How will you match the color if touch-ups are needed?”
* “Can you reinforce stress points to prevent future damage?”
* “What kind of guarantee do you offer on your work?”
* “How will you protect the existing patina while making repairs?”
While DIY care forms the foundation of leather maintenance, recognizing when to seek professional help demonstrates true wisdom in caring for your investment.
Understanding Long-Term Care: How Your Backpack Ages Beautifully
One of the most rewarding aspects of owning a quality leather backpack is watching it develop character over time. With proper care, leather doesn’t just get older—it gets better.
The Beauty of Natural Aging
Unlike synthetic materials that simply wear out, properly maintained leather develops patina—a rich character that tells the story of your travels. This natural aging process includes:
* Deepening and enrichment of color tones
* Softening of texture while maintaining strength
* Development of a natural luster from handling
* Subtle darkening in areas of frequent contact
* Unique character marks that make your backpack one-of-a-kind
Understanding leather types for durable bags helps you appreciate how different leathers will age and develop their unique characteristics.
Desirable Aging vs. Neglect
It’s important to distinguish between beautiful patina and signs of neglect:
Desirable Aging Signs:
* Even deepening of color
* Softening texture that remains supple
* Natural shine from oil absorption
* Slight darkening at touch points
* Subtle, natural creases at flex points
Undesirable Aging Signs:
* Cracking or flaking surfaces
* Stiff, dry texture
* Discoloration from mold or mildew
* Uneven fading from sun damage
* Sharp creases or structure deformation
The Sustainability Aspect
A well-maintained leather backpack can easily last 15-20 years or more, making it an environmentally conscious choice. By properly caring for your backpack, you’re:
* Reducing waste from frequent replacements
* Decreasing resource consumption
* Supporting the concept of buying fewer, better things
* Creating an item that may become an heirloom
This long-term perspective on leather care transforms maintenance from a chore into an investment in both your backpack’s future and environmental sustainability.
Natural Leather Scent Maintenance: Keeping Your Backpack Fresh
The distinctive aroma of quality leather is part of its appeal, but travel can introduce unwanted odors. Here’s how to maintain that natural leather scent while eliminating unwelcome smells.
Preserving Natural Leather Aroma
Quality leather has a pleasant, distinctive smell that many find appealing. To preserve this natural scent:
* Allow proper ventilation during storage
* Clean regularly to prevent buildup of odor-causing substances
* Use minimal scented products that might mask the natural leather smell
* Avoid storing in plastic, which can create musty odors
DIY Natural Leather Refresher
For enhancing the natural leather scent without chemical fragrances:
Recipe:
* 5 drops cedarwood essential oil
* 3 drops sandalwood essential oil
* 1 tablespoon (15 ml) sweet almond oil
Application:
1. Mix oils thoroughly in a small container
2. Apply a tiny amount to a clean cloth (not directly to leather)
3. Gently wipe across interior surfaces and seams
4. Allow to air out for 24 hours before using
Natural Deodorizing Methods
For eliminating unwanted odors without harsh chemicals:
* Create a baking soda sachet with a thin cloth and leave inside compartments overnight
* Place activated charcoal packets inside when storing to absorb odors
* Air dry in a well-ventilated shaded area after exposure to strong smells
* Use cedar blocks or lavender sachets during storage for gentle, natural fragrance
Understanding comprehensive leather maintenance for commuters and travelers helps you maintain both the appearance and pleasant aroma of your leather goods.
By maintaining your backpack’s natural scent profile, you enhance the sensory experience of using a quality leather item—making each journey with your backpack more enjoyable.