Introduction: Why Proper Backpack Adjustment Matters
Carrying a backpack seems simple enough, but when improperly adjusted, even the highest quality pack can cause discomfort, pain, and potential injury. The difference between an enjoyable journey and a painful trek often comes down to how well your backpack’s straps are adjusted to your unique body shape.
Proper backpack adjustment delivers several important benefits:
- Improved weight distribution that transfers load from vulnerable shoulders to stronger hip and leg muscles
- Enhanced stability that prevents the pack from shifting while you move
- Reduced strain on your neck, shoulders, and lower back
- Better posture while walking or hiking, preventing long-term musculoskeletal issues
- Increased energy efficiency as you expend less effort compensating for an unbalanced load
When straps aren’t adjusted correctly, the consequences can be immediate and lasting. Many people experience unnecessary shoulder pain, neck tension, and lower back discomfort simply because they’ve never learned the proper way to adjust their backpack.
At Summit Carry, we design our premium leather conditioning and waterproofing process to ensure straps remain supple and adjustable throughout years of use. Our commitment to proper ergonomics begins with design but ultimately relies on your understanding of proper adjustment techniques.
Before we delve into the specific adjustment process, remember that your backpack should work with your body, not against it. The principles behind unlocking comfort in ergonomic backpacks apply whether you’re commuting to work or trekking through mountains.
Understanding Your Backpack’s Adjustment Features
Before making any adjustments, you should familiarize yourself with the various components of your backpack’s carrying system:
Shoulder Straps: These bear some of the weight and keep the pack close to your body. Quality shoulder straps are contoured to match your body’s natural shape and feature adequate padding to prevent pressure points.
Hip Belt: Perhaps the most critical component, this wide, padded belt transfers the majority of weight (60-80%) from your shoulders to your hips and legs. The hip belt should wrap around your iliac crest (the top ridge of your hip bones).
Sternum Strap: This smaller strap connects the shoulder straps across your chest, preventing them from slipping off your shoulders and improving stability.
Load Lifters: These small straps connect the top of the shoulder straps to the top of the pack frame, allowing you to control how close the pack sits to your upper back.
Compression Straps: Located on the sides and sometimes bottom of the pack, these help stabilize your load by cinching down the pack contents to prevent shifting.
The combination of these elements creates a system that, when properly adjusted, distributes weight efficiently and maintains stability. Our leather travel backpacks incorporate these adjustable features while maintaining the timeless aesthetic and durability that leather provides.
Before You Begin: Preparing Your Backpack for Adjustment
Proper adjustment starts with preparation. Follow these steps before you begin adjusting the straps:
Load your pack realistically. Adjust with the approximate weight you typically carry. An empty pack will fit differently than one loaded with gear.
Organize weight properly. Place heavier items close to your back and centered between your shoulder blades. This keeps the center of gravity near your body for better balance.
Loosen all straps completely. Start with all straps loosened to their maximum extent so you can follow the correct adjustment sequence.
Put the pack on and stand up straight. Good posture during adjustment ensures the pack will fit properly during actual use.
Have a friend assist if possible. Some adjustments are easier with help, especially when checking alignment and fit from behind.
Over time, leather straps develop a unique character and may require occasional conditioning for your leather backpack. This maintenance ensures your adjustment system remains functional and extends the life of your pack.
Determining Your Torso Length: The Foundation of Perfect Fit
The cornerstone of proper backpack fit is matching the pack to your torso length—not your overall height. Two people of identical height might have completely different torso measurements, resulting in entirely different backpack fit requirements.
To measure your torso length:
Locate your C7 vertebra by tilting your head forward and finding the prominent bone at the base of your neck.
Find your iliac crest by placing your hands on your hips, with thumbs pointing toward your spine along the top of your hip bones.
Measure the distance between your C7 vertebra and the point where an imaginary line between your thumbs crosses your spine. This measurement in inches is your torso length.
Compare to your backpack’s specifications. Most quality backpacks list their torso length range or offer adjustability to accommodate different sizes.
If your current backpack doesn’t match your torso length, you may need to consider what size backpack you need to achieve proper fit. Even the most meticulous adjustment can’t compensate for a fundamentally mismatched pack size.
Once you’ve confirmed your backpack is appropriate for your torso length, you’re ready to begin the systematic adjustment process.
Step 1: Positioning and Tightening the Hip Belt
The hip belt is the foundation of proper weight distribution, so it’s always the first adjustment to make:
Position the backpack so the hip belt sits centered on your iliac crest (hip bones)—not above on your waist or below on your buttocks.
Close the hip belt buckle and pull the straps forward on both sides simultaneously, tightening with equal tension.
The belt should be snug but comfortable. You should be able to fit two fingers between your body and the belt (the “two-finger test”).
Check that the padded portions of the belt wrap around your hip bones, with the buckle centered on your abdomen.
Common mistakes with hip belt positioning include:
- Wearing it too high: This puts weight on your soft abdomen instead of your hip bones
- Wearing it too low: This restricts leg movement and causes the pack to sag
- Uneven tightening: This creates imbalance and can cause the pack to pull to one side
Proper hip belt positioning is fundamental to how backpack design affects posture and weight distribution. When correctly positioned, you should feel most of the pack’s weight transferred to your hips rather than hanging from your shoulders.
Step 2: Adjusting the Shoulder Straps
With the hip belt properly secured, move on to the shoulder straps:
Pull down and slightly back on the lower adjustment straps to secure the shoulder straps.
The padded portion of the straps should wrap over your shoulders and end 1-2 inches below the armpits.
The anchor points of the shoulder straps should sit 1-2 inches below the top of your shoulders, never above them.
Tighten until the straps make full contact with your shoulders but don’t bear significant weight—remember, most weight should be on your hips.
Check for proper fit using these indicators:
- No gaps should exist between the shoulder straps and your shoulders
- No pinching or digging into your shoulders or armpits
- Freedom of movement remains in your arms and upper body
- Even contact along the length of both straps
Many leather rucksack designs feature contoured shoulder straps that naturally follow the curve of your shoulders, enhancing comfort during long periods of wear. Quality padding distributes pressure evenly without creating pressure points.
Step 3: Securing the Sternum Strap
The sternum strap, though small, plays an important role in stabilizing your pack and preventing shoulder strain:
Position the strap approximately 1-2 inches below your collarbone.
Adjust the height of the strap if your backpack allows for vertical adjustment.
Buckle the strap and tighten just enough to bring the shoulder straps inward to a comfortable position on your shoulders.
Ensure you can still breathe deeply with the strap secured—it should never restrict your chest expansion.
The sternum strap is especially useful for:
– Preventing shoulder straps from slipping off narrow shoulders
– Distributing weight more evenly across your chest
– Stabilizing the pack during active movement
– Reducing shoulder fatigue during extended wear
For carry-on leather backpacks, the sternum strap provides crucial stability when navigating busy airports or running to catch connections. However, some users prefer not to use this strap during casual urban use for comfort or style preferences.
Step 4: Fine-Tuning with Load Lifter Straps
Load lifters are often overlooked but are essential for perfecting your pack’s balance:
Locate the small straps that connect the top of your shoulder straps to the upper frame or body of the pack.
Pull these straps to bring the top of the pack closer to your body.
Adjust until they form approximately a 30-45 degree angle from your shoulders to the pack.
Check that the pack feels like it’s hugging your upper back rather than pulling away from it.
Proper load lifter adjustment prevents the sensation of the pack pulling you backward. When adjusted correctly, the weight feels more centered over your hips rather than dragging behind you.
If your load lifters are too tight, they can create uncomfortable pressure points and cause the shoulder straps to lift off your shoulders near your neck. Too loose, and the top of your pack will lean away from your body, creating unnecessary strain.
Regular maintenance, including waterproofing leather bags, helps ensure that all straps remain functional and responsive to adjustment, particularly in challenging weather conditions.
Step 5: Using Compression and Stabilizer Straps
Compression straps are the final element in creating a stable, comfortable load:
Pack your gear efficiently, placing heavy items close to your back and centered in the pack.
Tighten side compression straps to bring the load closer to your center of gravity.
If your pack has bottom compression straps, secure them to prevent gear from sagging to the bottom.
Adjust any top compression or stabilizer straps to secure items and prevent shifting.
Proper compression creates several benefits:
– Reduces pack sway during movement
– Maintains your center of gravity
– Prevents items from shifting inside the pack
– Creates a more streamlined profile
The “shake test” is a quick way to check your compression adjustments: with the pack fully loaded and all straps adjusted, gently shake your upper body. A properly compressed pack will move with you as one unit rather than shifting independently.
Quality leather backpacks maintain their structure even with minimal compression, thanks to the inherent stability of premium materials. The natural body and structure of well-crafted leather helps maintain pack shape even when not fully loaded.
Testing Your Backpack Fit: The Movement Check

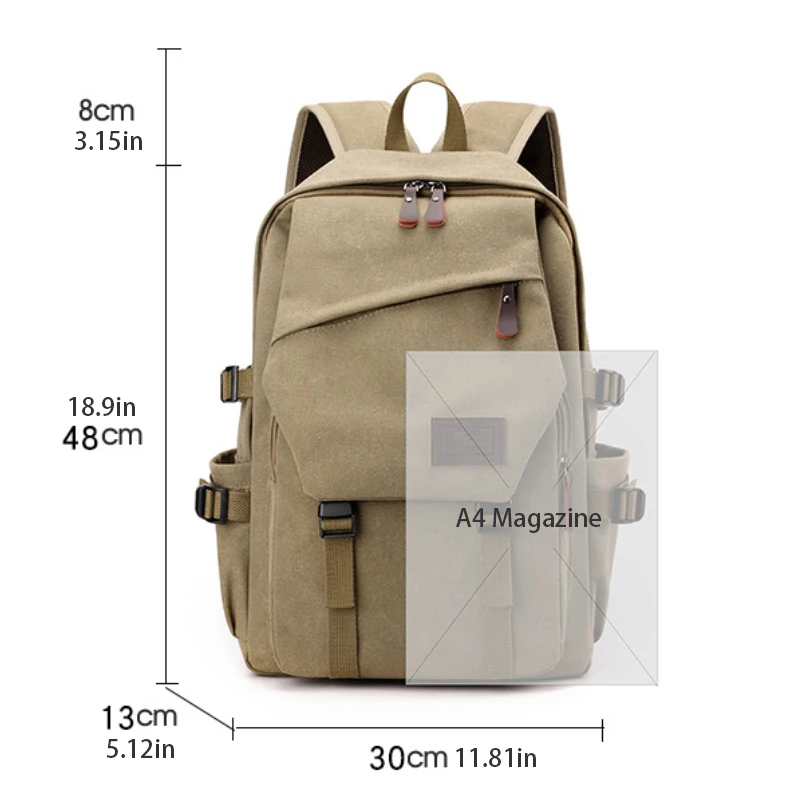
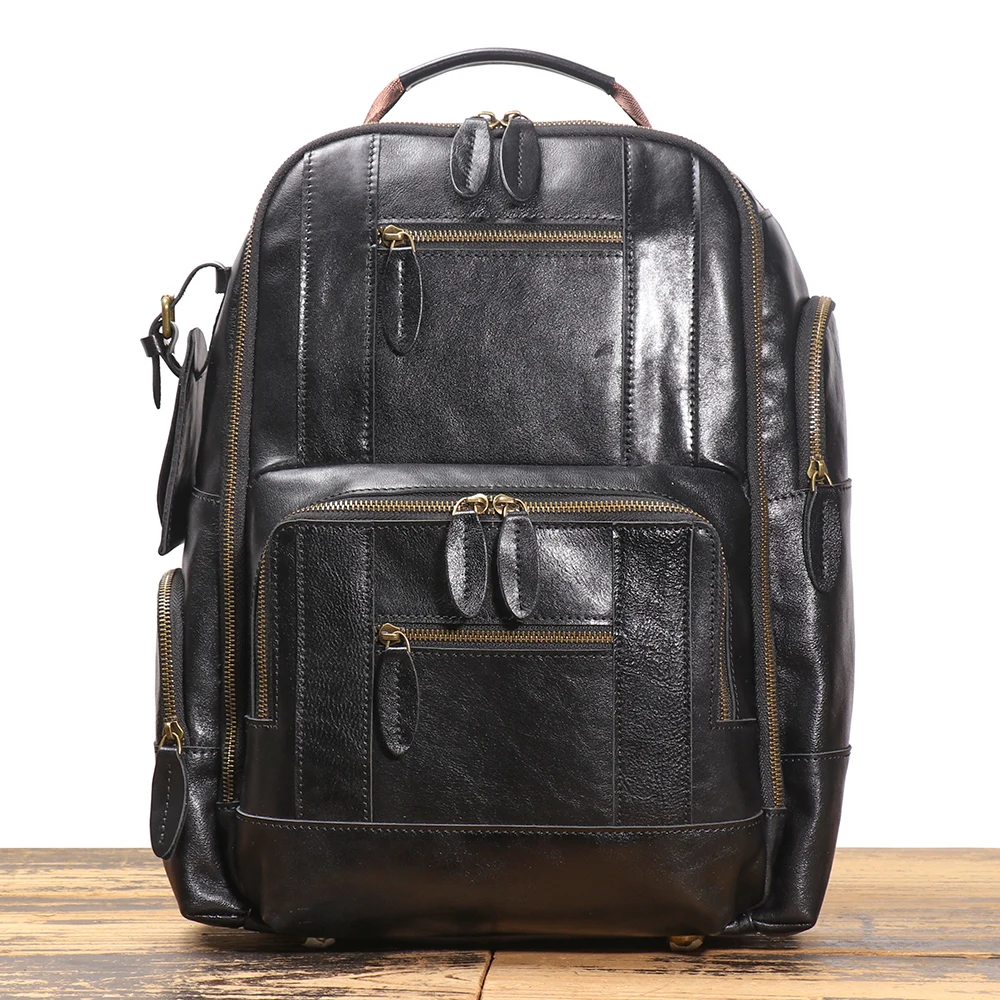
14 Inch Leather Laptop Backpack, Brown Leather Backpack, Men's Leather Backpack, Vintage Leather Backpack
Price range: $177.28 through $199.12 Select options This product has multiple variants. The options may be chosen on the product page
Carry On Leather Backpack, Roll Top Leather Backpack
Price range: $77.76 through $96.48 Select options This product has multiple variants. The options may be chosen on the product page
Designer Mini Backpack, Mini Leather Backpack, Small Leather Sling Backpack, Women's Leather Backpack
Price range: $95.76 through $98.80 Select options This product has multiple variants. The options may be chosen on the product page
Designer Mini Backpack, Designer Women's Backpack, Mini Leather Backpack, Women's Leather Backpack
Price range: $135.92 through $137.64 Select options This product has multiple variants. The options may be chosen on the product page
17 Inch Leather Laptop Backpack, Men's Leather Travel Backpack, Men's Leather Work Backpack
Price range: $106.28 through $143.88 Select options This product has multiple variants. The options may be chosen on the product page
Black Leather Backpack, Small Leather Backpack, Women's Leather Backpack
Price range: $112.96 through $116.12 Select options This product has multiple variants. The options may be chosen on the product page
Once you’ve completed all adjustments, test your pack’s fit with these movements:
- Walk normally for about 50 steps, paying attention to any pressure points or movement of the pack
- Bend forward at the waist as if picking something up—the pack should move with you without shifting dramatically
- Rotate your torso left and right—the pack should move with your body without excessive swaying
- Reach upward with both arms—shoulder straps should remain comfortable without digging in
- Take several deep breaths—no straps should restrict your breathing
During these movements, check for:
– Stable positioning of the pack against your back
– No pressure points causing discomfort
– Weight primarily on hips, not shoulders
– No restriction of normal movements
– No shifting or swaying of the pack independent of your body
Different backpack uses require different fit priorities. A hiking pack might emphasize stability during varied terrain, while full-grain leather backpacks designed for urban commuting should allow freer movement while maintaining professional appearance.
Troubleshooting Common Fit Problems
Even with careful adjustment, you might encounter these common issues:
Shoulder Pain or Numbness
– Cause: Shoulder straps bearing too much weight or positioned incorrectly
– Solution: Loosen shoulder straps slightly and ensure hip belt is properly tightened and positioned to take more weight
Lower Back Discomfort
– Cause: Hip belt positioned incorrectly or pack riding too low
– Solution: Reposition hip belt directly on iliac crest and tighten load lifters to bring pack closer to upper back
Hip Belt Rubbing or Pressure Points
– Cause: Belt too tight or positioned on soft tissue rather than hip bones
– Solution: Reposition belt on hip bones and slightly reduce tension while maintaining support
Pack Swaying or Feeling Unstable
– Cause: Insufficient compression or load lifters too loose
– Solution: Tighten compression straps and adjust load lifters to bring pack closer to body
Feeling Pulled Backward
– Cause: Center of gravity too far from back or load lifters improperly adjusted
– Solution: Repack heavier items closer to back and adjust load lifters to proper angle
If adjustments don’t resolve your comfort issues, you may need to reconsider choosing the perfect backpack volume for your needs. Sometimes the most precisely adjusted pack still won’t feel right if it’s fundamentally the wrong size or style for your needs.
Advanced Adjustment Techniques for Specific Activities
Different activities demand different adjustment approaches:
Hiking and Backpacking
– Keep hip belt slightly tighter to maximize stability on uneven terrain
– Adjust load lifters more precisely to maintain balance on inclines/declines
– Use all compression straps to prevent load shifting during active movement
– Loosen slightly when walking uphill; tighten when going downhill
Daily Commuting
– Focus on comfortable shoulder strap positioning for frequent on/off
– Use moderate hip belt tension for support without restricting movement
– Consider whether sternum strap is necessary for your commuting needs
– Allow slightly looser overall fit for comfort in transit environments
Travel with Varying Loads
– Learn to quickly readjust as contents change (removing laptop, etc.)
– Use compression straps to maintain pack shape even when partially empty
– Slightly tighter hip belt when navigating crowded areas for security
– Looser fit when standing in lines or during extended wear
Seasonal changes also require adjustment modifications—winter clothing layers can significantly change how straps fit, requiring looser settings than summer attire.
Regular DIY leather care for travel backpacks ensures your adjustment points remain functional and responsive regardless of activity or conditions.
Maintaining Your Backpack’s Adjustment System
To ensure continued adjustability and comfort:
- Keep buckles clean and free of dirt that could interfere with adjustment
- Wipe down webbing straps periodically with a damp cloth
- Store your backpack with straps loosened to prevent deformation
- Check stitching regularly for signs of wear, especially at adjustment points
- Clean leather components appropriately to maintain suppleness and prevent cracking
- Avoid leaving your pack in extreme heat, which can damage both leather and synthetic components
- Inspect buckles and hardware for signs of wear or damage
By maintaining your pack’s adjustment system, you ensure it will continue to provide optimal comfort throughout its lifespan. Quality materials like those used in Summit Carry backpacks respond well to proper care and will maintain their adjustability for years.
Finding Your Perfect Fit: Personalizing Beyond the Basics
While the adjustment steps outlined above provide a solid foundation, perfect fit is ultimately personal. Each body is unique, and your ideal adjustment may differ slightly from textbook recommendations.
Some personal factors that influence optimal adjustment include:
- Body proportions beyond simple torso length
- Previous injuries that affect how you carry weight
- Personal comfort preferences regarding strap tension
- Activity-specific needs that may require specialized adjustments
- Changes in physical condition over time
Take time to experiment with minor variations in strap position and tension. The “correct” adjustment is ultimately the one that feels most comfortable for your specific body and activities.
Premium backpacks made with quality materials often become more comfortable over time. Leather straps conform to your body’s shape, and adjustment points become tuned to your preferences through regular use.
When Should You Readjust Your Backpack Straps?
Regular readjustment is part of backpack ownership. You should readjust your straps:
During your journey when:
– You’ve been walking for more than an hour
– You’ve changed significant clothing layers
– You notice discomfort developing in any area
– After taking your pack off for a break
Between trips when:
– Changing the volume or weight of your typical load
– Switching between seasonal clothing
– You notice changes in your physical condition
– The pack has broken in and straps have settled
Quick on-the-go adjustments often focus on the shoulder straps and load lifters, which can be easily modified while wearing the pack. More comprehensive readjustments, including hip belt repositioning, usually require taking the pack off briefly.
Remember that proper adjustment is not a one-time process but an ongoing relationship between you and your backpack. Taking the time to master these techniques ensures every journey with your pack is comfortable, efficient, and enjoyable.